FOR SALE

Primary Mirror 315mm

Diameter of 315mm.

Focal Length 1560mm.

The plate thickness of about 40mm

Material- Optical Glass Bk 7

Cena 1700PLN

315mm Mirror

315mm mirror

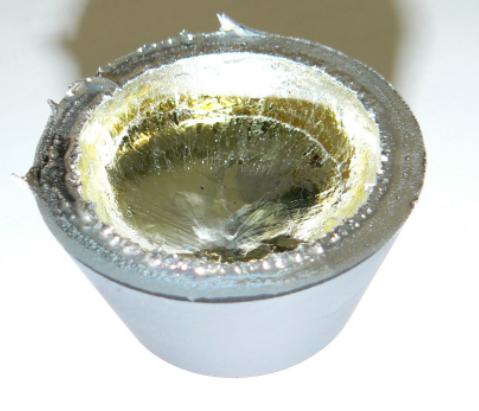
Mirror of sputtered. It has a recess visible in the picture. That gap is not an open field and was cut and before figuryzacją. It has no effect on the given images. Price to low negotiation.


Primary Mirror 280mm

Diameter of 280mm

Mirror made once by p. Poruczkę. Soon, I will focus and the price, also checks the accuracy of performance. (I am not the owner of this mirror)


Published in the category: Uncategorized |

Examination of flat mirrors

Often the bad images the telescope primary mirror is not responsible or bad collimation optics, but just plane mirror. Plane mirror should have a precision of lambda / 4 and if it is issued with one, This will produce very good images. The best form of checking the quality of the implementation of a flat mirror is interferometer study. Unfortunately this is expensive equipment and thus less accessible to astroamatorów. It is much easier with a glass test interference. But while the study by the interferometer is a noninvasive, in the case study of the mirror glass test must be applied directly to said test surface of a mirror. And here arises the problem, because to do it right, You must have some experience. Firstly, both the surface of the mirror under test and the test must be absolutely clean. Any contamination between the mirror and the test will result in inability to properly measure, the additive risk of scratching the mirror test and. I would add, that while the individual features of the primary mirror are virtually no effect on image quality, is very scratched plane mirror can unfortunately worsen given images. Using scratched test increases the risk of damage to the surface of the respondents, harder it is also properly applied the test. Some people examining the surface using an interference test, put a mirror between the test strips of thin paper, and thus do not permit to cross the surface damage (This is obviously only possible when testing flat surfaces).

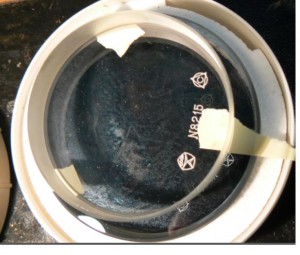
Application of test to the test surface with three dividers paper. Only possible when checking flat surfaces

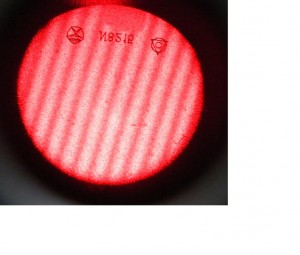
This method has one major drawback. Well, generally obtains an image of a large number of thin bands. Of their shape harder to really authoritatively judge the quality of the surface. The ideal is to get a picture, say, three bands, one passing through the center of the mirror and the two sides at the edges. It is worth examining the two sides of the mirror, so that for the first time bands moose ran along the long and the second time along the short. The following image obtained during the test surface using an interferometer made by me.

Image very well done flat surface, interferometer test my design..

Published in the category: Uncategorized |

-Collimated binoculars justification.

Binoculars are a good tool for observing the night sky. First, they are mobile, you can take with you everywhere; in the case of smaller magnifications give the opportunity to observe without a tripod (binoculars are especially prized by the parameters 10×50 i 7×50), so you can quickly explore the sky. A great advantage of the observation
by binocular stereoscopic vision is.

One of the most common defects found in binoculars is the optical axis nierównoległość. It is said, Ze lornetka but “black”. Even with ground-based observations it is tiring – the observation of stars image is not acceptable, just all the stars we see double. To some extent, the brain consists of a double image in a, However, above a certain value, it becomes impossible. When the telescope optical axis parallelism is on the boundary adjustment capabilities of our brain, may happen, double image that is still lodged in a, But very quickly comes to the eye and head pain.

Empiricism revealed, that the eyes do not feel tired, the convergence of rays emerging from the eyepiece of the main does not exceed the angle 1 degree, in a plane passing through the center of eye pupils. While the major divergence of rays emerging from the eyepiece may occur 3 degrees and the divergence in the direction perpendicular to a plane passing through the center of the pupils may not exceed 30 second.
Good binoculars are usually embedded in the lens of the lens used to adjustment eccentricity.


Objective lens binoculars. After removing the cover can be seen the rings eccentricity.

In amateur conditions appropriate to set the binoculars is difficult, although possible. It is turning the eccentrics in the lenses to check the effect of this action on some very distant object. If we consider that the two images overlap, it is yet to see the effect of this action on the stars. This is the best test, What can be done home-.

Some binoculars have lenses attached to a centering ring, while in the case of prisms are screws that can be used slightly tilted prisms and thus kolimować binoculars. The new binoculars often do not see these screws, There are in fact under the rubber veneer. To get to them, be separated gently around the gum and stick it back surgery such as: butaprenem. With a little practice you keep your gums and only whole site, where are the screws. In the older binoculars (black, solid metal with a matte veneer) collimation screws are either easily visible in small wells in the veneer, or are pitched black substance. Then it is harder to locate them, magnifying glass may be helpful. In the old binoculars occurs, that used for the collimation screws are so baked, the only way to repair the old binoculars is drilled screws and enforce new, somewhat larger than the thread.

The most difficult for the collimation of binoculars which are the two prisms are closely interlocked fixed on a special plate. This disc is then the six screws,located in pairs, this solution is analogous to that used in the fittings of the main mirror telescopes. The collimation of binoculars is so much more work, that after each intervention in the plate is discussed with the need to make prism binoculars, check the effect and possibly spread over, to get to the screws in the plate and correct operation.

Often rozkolimowanie binoculars is a consequence of the collapse or shock. It may be then, that it can not by themselves justify turning the eccentrics of the lens. It then unscrew the lens and see if there has been no shift in any of the prisms. They are seated in their slots and
pressed flat springs. If the notice,that one is not wrong prism to the plane of its socket, is strangely skewed, This should release the flat spring, Gently place the lens in place and press it again spring.

Prism binoculars visible after removing the lens

It is important that the cutting of binoculars do not touch any of the active surface of the lenses and prisms. Left fingerprints on them really interfere with the observations. If you have already reached dirty glass, best to wash it with pure alcohol (even the food, rectified), in no case may be, however, salicylic alcohol. Pollens and other minor impurities preferably are removed by blowing a stream of air from the rubber bulb (sold in pharmacies), can also assist with a brush or badger hair squirrel.

Collimation professional binoculars and other instruments dwuocznych performed using binocular lunetki and wide field collimator, possibly two collimators with a wide field, whose optical axes are parallel.
Lunetki binocular glasses are marked with the tolerance, which should be visible in kolimatorach crosses a wide field
Photo:

Field tolerance together with the cross visible in the eyepiece binocular lunetki


My studio has an optical bench equipped, inter alia, reflected laser binocular and collimators for wide field so we can fully professionally kolimować binoculars.

10x50 binoculars during adjustment using binocular and collimators lunetki

Published in the category: Uncategorized |

Polishing

Polishing of the mirror and give it the desired shape is obviously the most difficult stage in the whole construction of the telescope; this follows from the need to give the mirror telescopic aspherical shape with very high accuracy. I, if mirror grinding, its shape did not have a big impact, This case is when polishing is quite different – polished glass on the pitch, somewhat flexible, “flowing” during the polishing. From the selection of its hardness depends largely on the success or failure of the whole fun in polishing the mirror to the telescope. Many people achieve the appropriate hardness by adding to the melting tar rosin. Then, the molten mixture is put spatula, embedded tar-water cooling and pressing, eg. watch toenail, and is followed. I personally advise you to buy a ready-pitch optical. We then guarantee, that during the melting and mixing with rosin not fall to us to involve any, even the smallest trash. And any hard-ons embedded in the tar that cause our telescope mirror will be quite heavily scratched.
The finished optical tar pitch at least I can recommend the brand “Gugolz” or numerach 55 do 64. Higher numbers correspond to the already very hard smołom, unlikely to be used in ATM.
Once we have tar- , it must be dissolved in a clean metal bowl, always being careful not to get into the pollution. The plate on which we polerownik thoroughly wash and dry. Taped to the edge of the plate with several layers of paper tape (adhesive) so that the pitch has drained us of the plate. After pouring tar, It should impress on (sanded to a powder 800 or finer) mirror. This must be done very carefully, so that the mirror is not to tar przylepiło. I personally always wait until the surface creates a “raft” of tar zastygniętej. Additionally, you can cover the surface of the mirror with a thin layer of the telescopic suspension polishing powder. It is important, that we were able to exactly match the pitch of the mirror, if this fails at the first attempt, tar is worth a little heated, eg by means of hot water, lamp with a strong energy-saving bulb is not, or even a burner with caution. When the pitch will accordingly Plastic, mirror again pressed against her. If we consider now, that mirror duly wrong to tar, This should be on the cut grooves, becoming like a bit of tar to the surface of chocolate. The grooves are similar to the tire tread- drain excess slurry polishing powder and allow the hurt to the tar surface of the mirror during polishing. With proper practice, you can pitch scored differently, However, for beginners of this method is most appropriate. While undercutting tar, particles of it are able to adhere odpryskujące Hand. The easiest way to wash them in very cold water. Tar loses flexibility and is easier then walks away from the skin. Use very hot water will cause the pitch will become sticky and clog very effectively with our hands. Then the easiest domyć it with gasoline and turpentine (not mixed together). When the pitch is ready, begin to shine. There is some similarity to the grinding, long movements of the mirror to reduce the focal pitch, short movements can be extended. putting tar on the top and bottom of the mirror will also focus on extending.

At the end, unfortunately, the analogy with the grinding. Because the pitch is flexible, mirror does not need us to polish while maintaining the spherical shape. I really can not be given ready-made recipes to mirror movements in the pitch, to maintain the desired shape. You have to experiment yourself. Some polish the mirror to remove completely the remaining pits after the cut and then try to get the sphere. I personally advise you to check the mirror from the beginning in terms of deviations from the sphere. This will save a lot of trouble, will advance to correct movements and appropriate intervention in the form of tar. And if for example we see , that in our time polishing the mirror in the middle of the hole formed, to measure tar lightly scratch with a knife. Similarly,, if we are tucked up ashore, This should shore tar scratch. Interference in pitch must be very delicate, so, during polishing to pitch again put together over time to the shape of the mirror. It is important to control and correct assessment of whether our mirror is polished and has not been any holes after sanding powder. Very helpful here is a good light and magnifier with a magnification of about 8-10x. It is difficult to describe the proper way to control but it is more or less on observation with a magnifying glass surrounding the light reflectance of the mirror surface. Any small dots observed through a magnifying glass are saying about the need for further polishing. I would add,spraying such that the mirror, only highlight any shortcomings in the polishing. The mirror in this place is simply dull. …

As I mentioned, worth from the very beginning of the polishing of the mirror to check on the knife and did not allow for too much deviation from the sphere. How to interpret the images with a knife Foucalt,and very well described by Janusz Wiland on your site: http://www.astrojawil.pl / jazzz.htm.


Published in the category: Polishing, Glass |

Something about anti-reflective layers and possibilities of their recovery in the old optics.

What are anti-reflection layer, probably most people know. They increase the amount of light passing through the optical system. This is done napylając glass surfaces with well-defined layer thickness, material with a suitably chosen refractive index. In theory, how to choose the refractive index, and the thickness I will not go into this place, You can find it (to the extent that the understanding) in most textbooks dealing with optics and some physics textbooks. I once met with the objection (worse, a renowned technical university student), that imposing any layer on the glass, You can not increase the amount of light passing through them. However, you can look at the matter differently: should be remembered , that light has a wave nature, therefore, in appropriately selected layer interference occurs, through which reflection can be enhanced ( dielectric mirror) anti-reflection layer or lower case.

The simplest layer, made of one material, allows for anti-reflective-type V, that is, the minimum reflection is obtained for one, a specific wavelength. For example. For the layer reduces the reflection to some extent , ie.. for visible light, multilayer coating is used.

Many people try to “na Oko” assess the quality of the layer, mostly based on its color. This is another mistake. I have often heard such comments, old binoculars that are beautiful, blue layer, which are very good. Well, nothing is further from the truth. In the old binoculars (and not only) layers were generally single, So these were the type antyrefleksy “In” usually made of magnesium fluoride, which in addition is quite soft. The old evaporator gave no other option. In addition, adequate measures were not, allowing a very precisely defined thickness and finish it fast evaporation. Optician, from whom I learned to use modern napylarek, told me, that in the old apparatus of vacuum layer thickness is often obtained by calculating the evaporator chamber size and density of the material and quantity naparowywanego (mass), that it was necessary to evaporate completely, to obtain specified thickness. This of course gave very different results. Returning to the colors of the layers, human eye is able to pick out the color, which the reflected light is 0,1% more than other colors. From this it follows, that if we have a layer that reflects, say, 0,1% visible light, but for the wave length 630 nm reflection grows to 0,2%, that the human eye, layer will have a red color. And this layer is spectrally much better than, say, such, which reflects the average 0,2% give to Gorky 0,3% will have to wave 550 nm. Thus the frequent finding that beautiful amateur, greenish layers are much better than the reddish are simply unfounded.

I, that some people buying a used optical equipment, are unhappy with the quality of the layers; surface of the lens seems to be scratched, Layer look , if partly descended from a glass. Then the question arises, whether such a layer can be regenerated. Theoretically yes, Only certain conditions are, which in practice usually can not be met. Firstly, need to know the refractive index of glass of which the lens. Secondly, to impose a new layer to get rid of the old. There are special fluids, that allow you to remove certain types of layers. However sięwarstwa often resistant to the fluid, or worse, glass sensitive to this drug. As a result,, after the application of fluid, in extreme cases, we will be with partially or not at all removed and a layer of glass lens nadtrwionym. Sometimes this layer can be spolerować, but this method also is not sure. I spoke with the optician once, who tried to rebuild the front lenses of photographic lenses, used to take pictures in the metallurgical, where they were exposed to feather into the surface of metal particles. The problem with spolerowywaniu layer consisted of the, that the hardness of different layers of glass and, surface is not evenly spolerowywała, in addition sometimes a piece could break off and scratch the surface layers. safer to perform a special tool and grinding layers of fine powder, and then polished. Only now are the high costs, in addition it is not known, whether to collect even a small amount of glass will not change the optical parameters of the lens to the extent that continued use in combination with other elements. Both spolerowując and zeszlifowując old layer, have previously measured the curvature of the lens and then by polishing to obtain the same. Here you need the interferometer.

Even more complicated case when we deal with the element (ie.. achromatem) in which the component lenses are glued. Takowego lens insertion apparatus broken glass vacuum will result of different thermal expansion of glasses with lenses made components which. It is therefore the optical element unstick. I would add, that the individual components are usually sprayed achromatu different anti-reflection layer, to obtain the same spectral properties. This is due to different refraction wspłczynników flintu and kronu. Achromatu old is putting up a risky occupation, and not always successful (read: nieposzczerbionym or glass niepopękanym). Achromatu re-gluing operation which is another qualified employee must perform the appropriate instrument. Here the problem is, that after the first, you need to know how well the glue squeeze out from between the bonded lens, secondly, a special instrument so you need to set the optical axes of the component lenses, would be covered.

In sum- process to impose new layers must be made in good optical plant,by good professionals. Thus, it is a costly procedure. Putting the lens into the hands of chałturnika over at least the deterioration of optical properties and possible, that even its destruction.

Published in the category: Layers | Labels , |

Grinding

I will not duplicate messages, which is a lot about grinding mirrors for telescopes in amateur conditions. Instead I will focus on errors, that most beginners make when grinding cutters.

PHASE .

Before you start sanding it is essential to carry out phase on the ground. Phase should be large enough, We would not disappear during grinding. If you carry a small stage is when it is necessary to control the grinding, how much it was and if necessary, stop grinding and then enlarge the phase. Why phase is so important? Well, during the grinding of curvature, without the implementation of earlier phases on the edge of the mirror we get a sharp jagged edge, which is easily crushed glass obłamują. When a shard of glass falls under the ground surface, can be very nasty scratch. chamfer at home can do a fine whetstone or emery paper. Phase should preferably be smooth, nieposzarpana, her "mat" should look like after the powder No. 350 or finer. Then there is a high probability, with nothing out of it do not gets it during the grinding and polishing. I would add, that if such a shard of glass during grinding leaves only flaw is easy to remove, during polishing is able to drive the pitch polishing and mirror draw all the time. It is difficult to locate if such glass, you usually scrape the top layer of tar, to get rid of it.

TOO EARLY TO CHANGE POWDER finer and NIEDOSZLIFOWANY BEACH.

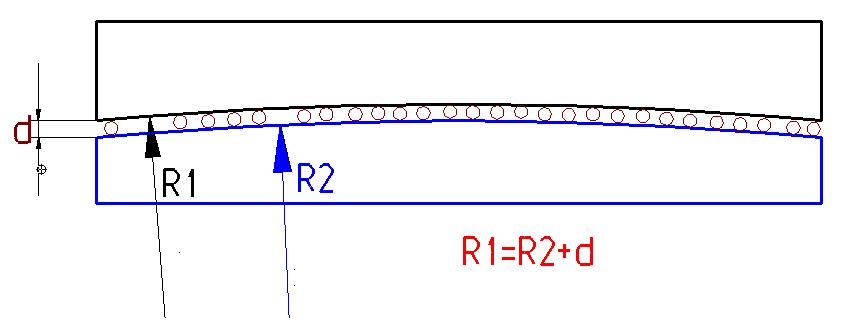
A common mistake is to go to finer powder at the moment, even when they are deeper "holes" in the thick powder. Such holes are especially at the edge of the mirror. Why is that I will explain using the following diagram.

As can be seen, radius of curvature concave mirror, is not equal, the length of the radius of curvature matrix convex. They differ in the average thickness of the grinding powder is placed between them. Turning to finer powder, for some time we have a situation, matrix in which the surface is in contact with the surface of the mirror (through a thin layer of powder), only in the central part. Therefore, the center of the mirror wyszlifuje much faster, edges of the slower. The entire surface of the mirror must be controlled with a good magnifying glass with a magnification of about 8-10x, in bright light. Only, when the entire surface is not the deeper holes of the previous powder, you can start grinding finer powder. It is worth comparing with the edge of the mirror center, whether the format is identical. If we leave by haste, niedoszlifowanej little edge, revenge is a fine powder during the grinding of four

Adjustment of

During the grinding and measuring the deflection may be,that the focal point of the mirror is a little too long or a little too short. The increase or decrease its impact according to the movements of the mirror during grinding. It is known, extension movements that shortens the focal length and shortening movements (smaller deflection) will extend the focal length. If we want to extend the focal length a lot quicker and a value, best to replace the mirror with a matrix of locations, so that the sensor is on top and then do a big swing. When shortening the focal length is often performed at the edge of the mirror motion sensor. This speeds up the job but you can easily lead to the situation illustrated in the figure below.

The center of the matrix as you can see has a different curvature than the rest of the mirror. We received what looked like a little “bulging” cone. On further grinding to obtain the matrix of the mirror with a hole in the middle. It is easy to, that the measurement of deflection in this case is very reliable and polishing such a mirror, even to the sphere will take much more time (measure will be a long dull,a longer focal length than would appear from the measurement arrows). So always focus on high-value adjustment for some time to grind the mirror of a classic, making movements by means of a matrix. To make sure that everything is ok, You can check the mirror with a depth and a low base sferometru. If the arrows indicate the measurement of different zones ( central and coastal) mirrors are identical, can assume that the mirror is good and deflection measurements reliable enough.

Published in the category: Glass, Grinding | Labels , , , , |

The study intended to mirror glass in terms of stress.


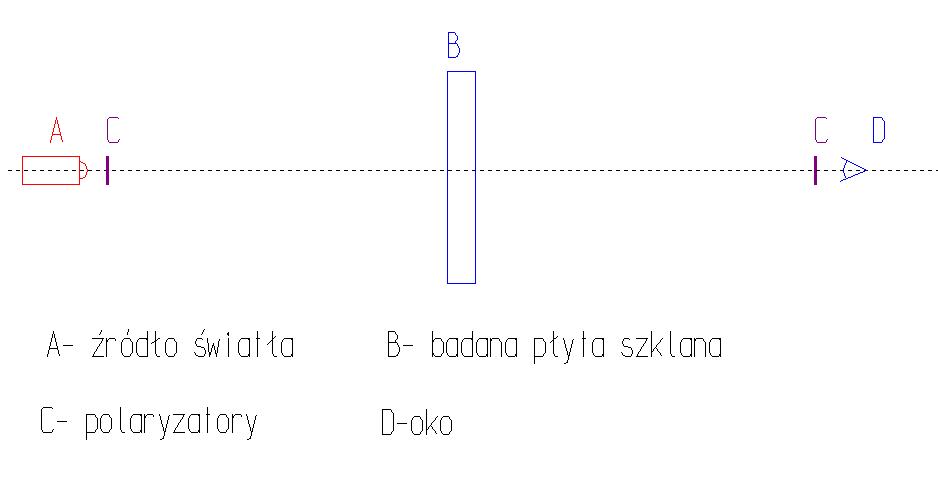
Of whether the glass is to stress , or not depends, whether he can manage to do him a good mirror. There are those who argue, that the stresses in the glass in no way interfere, But I strongly advise against working with glass poorly relaxed. Unluckily, the album from which I tried to do my first mirror had stress and could not even do it good sphere. Na nożu Foucault,and it looked, like I did during polishing “hill” the sphere, except that the center of this hill was not lying in the middle of the mirror but in the mid-radius. If the mirror can be seen performing at the time of the study some eccentrically decomposing inequality, This may be a sign, glass that has just stress. As far as glass type “float” usually a well-annealed, with other boards of unknown origin may already be different. So in order to avoid futile grinding and polishing, want to do a simple test for the presence of stress. For this purpose, the glass plate should be given x-ray polarized light, watching her at that time by the second polarizer, which must be rotated around the axis. If the disc still looks the same, that is to say , it does not have the stress. If we respect each other in different settings of polarizers , in the glass there is something resembling balloons with a cigarette, it is are areas of tension. Below is a schematic drawing of such a system to study the glass.

bad.nap.

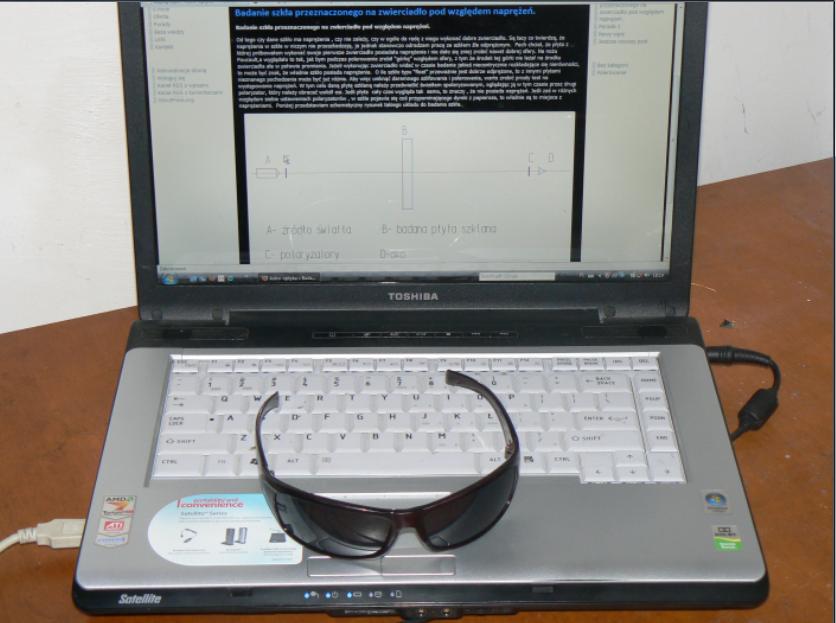
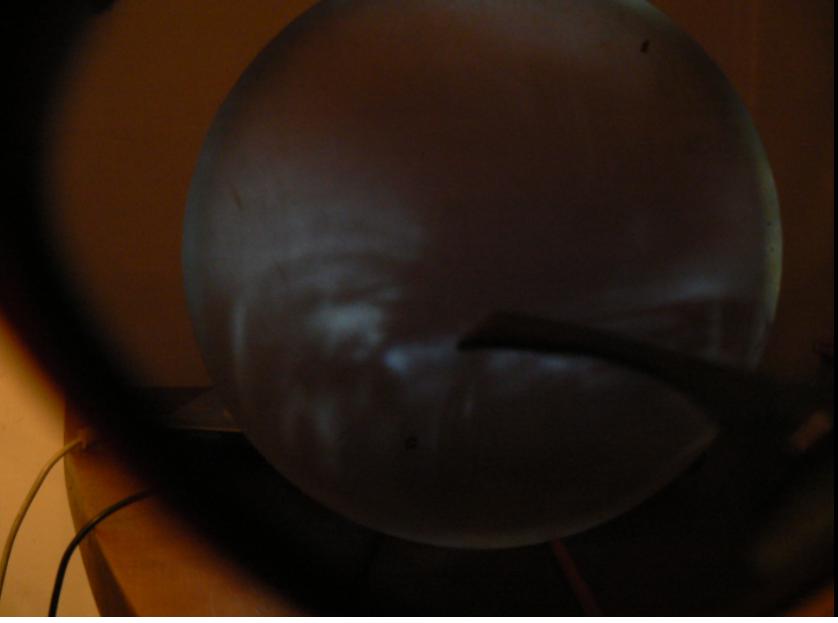
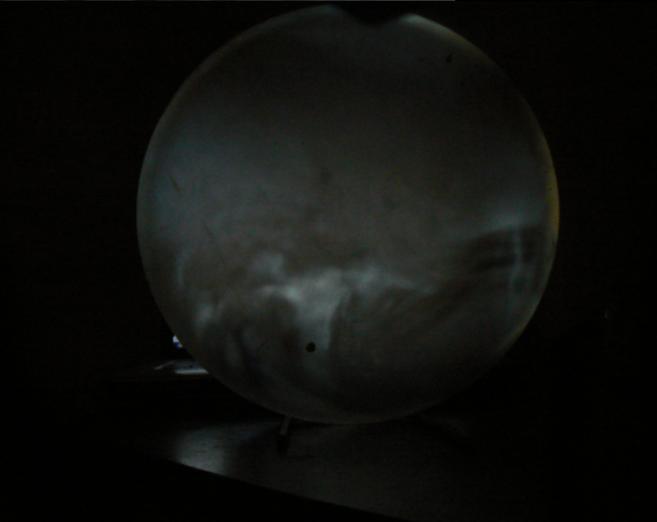
If you do not have at hand polarizers, such a test can be performed using the LCD display (np z laptop), which in this case is the source of polarized light, to watch a disc, use of glasses with a three-dimensional cinema, possibly other polarizing glasses, ie.: designed for anglers or drivers. It is easy to conclude, whether we are dealing with polarizing glasses, just watch the laptop screen by turning the glasses around the axis. If at some point the light reaching our eye from the laptop will be cut off then we are dealing with polarizing glasses. You can also perform such a test longer buying glasses- need to observe some source of light by two pairs of glasses, rotate relative to one another. Once we shut off the lights in any position, it is a sign that the two pairs of glasses are polarized, if, in spite of some glasses rotate relative to each other the intensity of light reaching the eye is fixed, it is a sign that at least one pair of polarized light is not. The following pictures show just such a “complicated” set of research, and a glass plate with detected using this set of stress

lap.okulnapr1napr2

Published in the category: Glass | Labels , , , , , , |

Reflective layer.

Aluminizacji mirror can not obviously be done in home conditions. It is our mirror to give to a plant specializing in the performance of optical thin films. Warn against spraying the mirrors in companies engaged in automotive headlight reflectors because the reflectivity of the layer and the uniformity of coverage may be far from the expected.

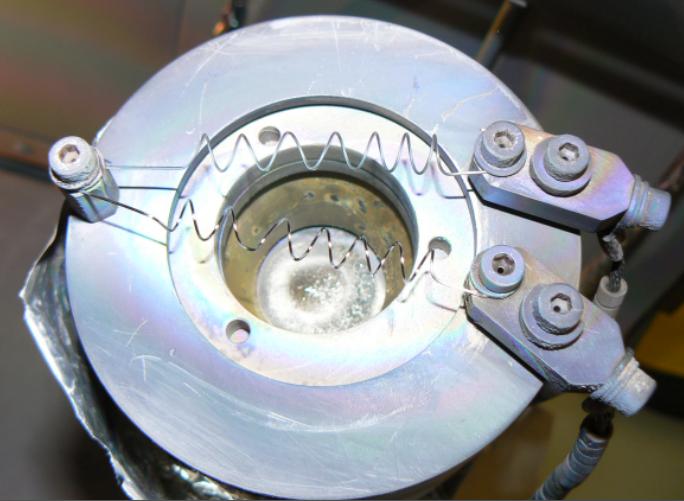
Reflecting layer in the mirrors of telescopes is mostly aluminum, vaporized in a glass vacuum napylarkach. As a source of aluminum, aluminum wire is used, cut into sections and curved in “horses” (it reminds “hacle” to sling) and suspended in the heating spirals. After connecting the voltage coil heats up , aluminum melts and dissolves in a spiral from which it gradually evaporates. Here is an image with just such a spiral of ponies.

spirala al.

Aluminum spiral with suspended "ponies"

This method of deposition of aluminum is used in napylarkach of oporowogrzejnym source parowania.Dużo better results are obtained in napylarkach which is the source of electron gun evaporation. They can evaporate aluminum with graphite crucible, which results in full control of the speed of evaporation and layer thickness performed. Aluminium used for the execution of the mirror has a purity 99,99%! Below the pictures sequentially: graphite crucible filled with molten aluminum and quartz-filled electron gun.

Graphite crucible filled with aluminum.

Electronic Gun

In napylarkach of oporowogrzejnym source layer thickness depends on the number of ponies established in the spiral, but it happens, after melting the aluminum can collect in a drop and fall, in consequence of which the layer is too thin. Speed ​​of evaporation also can not be maintained as closely as things happen in the case of electron pairing. Since the speed of evaporation and temperature, depends on the structure of which will build aluminum wrap on glass. We care, that it is amorphous. In the wrong conditions can build aluminum crystalline structure and consequently can lower reflectivity. I would add, napylarkach that the evaporation source oporowogrzejnym, only possible to perform protective layer of aluminum is a layer of magnesium fluoride, while using the electron protection works can be performed with both fluoride and quartz, or quartz and titanium oxide, which gives the best mechanical properties spektralno.

Many people wonder , as large differences in thickness of the layer formed during deposition. personally heard such opinions, that does not make sense to do a super accurate mirror, layer, and so he will introduce a large distortion on the surface. In good napylarkach used in the optical industry differences in the thickness of the layers are made about 1%. If we assume, that the aluminum layer thickness is 100 nm, This distortion of the resulting amount to 1nm! Thus small differences in thickness of layers are possible by using a special planetary system, mirror placed in a cell not only rotates around an axis through the center of the chamber but also about an axis through the center of the cell. To further align the layer thickness, additionally apply a special aperture, the shape and height are chosen largely experimentally.

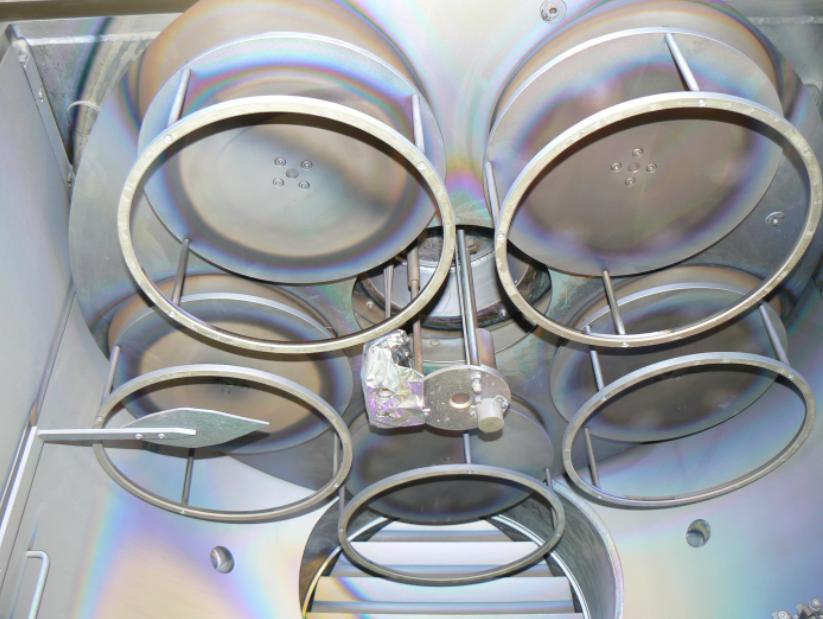
The interior of the apparatus of modern vacuum. Visible planetary system with five sectors and improving the uniformity of coverage of the iris.

Another, important factor that determines the quality of the coating is specular substrate surface cleanliness. It is important, of course, thorough cleaning, degreasing and removing static electricity from the surface of the mirror. Additionally, once the glass is in the apparatus, Ion cleaning is used. In older apparatus cleaning is performed fluorescent, simplifying the matter can describe it that way: inside the vacuum chamber is appropriately curved wire insulated from the housing. The application to the wire and the housing opposite poles of high voltage current ionizes the residual gas inside the chamber (possibly after obtaining a higher vacuum oxygenates to a level allowing it to ionization).This allows the surface are removed napylanej even small pollen, which may have to pick through electrostatic forces. In the modern apparatus of ion cleaning is done by running the ion. This gives much better results than the method described previously. Another advantage has equipped napylarek ion is, that the use of ion beam during the deposition process itself makes, that the aluminum layer is much better “packed”, is less “clearances” and particles, which would have had a bad stick, simply fall off. In the case of evaporation of transparent materials (Al-layer security) using ion has achieved a higher refractive index layer and a stronger.

Ion acts Gorge

Since the reflective layer applied not only depend on the mechanical properties, but also dusted the mirror spectral. Below I attach the graphic on the performance charts are reflective layers. Going from the highest sprawości are respectively: AL secured quartz and titanium oxide, then Al. Unsecured. Next , covering a large part of the graphs is the Al. magnesium fluoride protected and Al. secured by the same quartz. The apparent slight advantage in the efficiency layer of magnesium fluoride. in terms of mechanical strength of the LAYER SECURITY Quartz and Titanium oxides beats OTHER HEAD. Well situated just on the many, many years. Second in order is of course a layer of quartz. Protection of fluoride protects against oxidation, However, it is easy to draw such a layer when trying to clean.

I would add, that the spectral properties is very important to the thickness of the protective layer located. Due to the wave nature of light, to get a reflection in a row 96% krwarcu both thickness and titanium dioxide must be at least a quarter of the wavelength of light. The possibility of precise control of layer thickness of the transparent use of an optical sensor gives, while the thickness of the metallic layers is monitored by sensors, quartz. Or, to perform well with security zwierciało napylarka must have two types of sensors, the thickness and evaporation rate.

In sum, sputter the mirror in the optical apparatus to reach even 96% reflections, while not zniekształacając surface of the mirror. Evaporation of the mirror in the industrial napylarce, used for such: headlights, possible reflection about 86% With a little luck and even less, And with the outcome with great difficulty “lambda/10″ We may be “lambda/4″

Published in the category: Layers | Labels , , , , , , |

Grinding and polishing powders.

POWDER GRINDING.

The most commonly used powder is silicon carbide sanding (SIC) Zwany Karborundem. This material is obtained by artificially, having a color from greenish to black, which comes from pollution (pure is colorless).Its hardness on the Mohs scale is about. 9,2 do 9,5 ( for comparison, the hardness of talc = 1, hardness of diamond = 10).Another abrasive powder available to amateurs for the processing of the glass is elektrorund, or equivalent synthetic corundum. Al2O3 is chemically, its hardness is less than the carborundum and the Mohs scale is ~ 9 . Elektrorund is white ( it really is transparent).Due to the lower hardness of many amateurs use it performs very end of the grinding.

Abrasive powders are sorted by the producer and the grain size fractions are numbered, usually thicker proszkom are assigned lower numbers. For example, under present some grit abrasive powder and numbers assigned to it.

No. 80 - 200-160 μm

No. 150 - 100-80 μm

No. 24th-63-50 μm

No. 320 40-28 μm

No. 500 20-14 μm

No. 800            10-7 μm


Polishing Powders.

For polishing optics are most often used cerium oxide and iron oxide. Cerium oxide is usually in various shades of beige. Iron oxide is a brown color. Faster cerium oxide polished, while many astroamatorów iron oxide is used for final polishing step, because of its slower action allows more control over the final stages figuryzacji. In fact,use of the polishing powder depends on the individual preferences of the person polishing (I usually start and finish polishing with cerium oxide).

How to handle powders.

Always avoid confusion and confusion powders. Each gradation grinding powder should be stored in a separate, well-sealed container in which to save the number of gradation. Additionally, coarse powders should hold on another shelf or in a different drawer than fine powders, Polishing powders and away from the grinding if conditions allow. If we have a cabinet with some shelves, This on top, keep polishing powders, fine powders under grinding, while the lowest grinding coarse powders. polishing in terms of amateur, coarse powders can be applied to “drought” and then add water using a hand sprayer such as potted plants. Finer powders best applied with a brush after mixing with water. At the same time for each powder should have a separate brush. It's no illusion, hoping to wash the thick brush and apply powder to a fine not suffer the consequences in the form of scratches on the mirror.

Polishing powders are also the easiest brush applied as an aqueous suspension. There probably is not necessary to mention, that the brush must be designed exclusively for poleru!

Published in the category: Polishing | Labels , , , , , , , , , |